
I am a firm believer that the most memorable gifts are homemade. Granted, as Pinterest Fails have taught us all, they aren’t always the easiest or most convenient presents to give, but with a little bit of skill, creativity, and patience I’m convinced that the specialness of a one-of-a-kind present is worth the trouble. And, with the right approach, it’s possible to create a great do-it-yourself gift at the fraction of the cost of a store-bought one.
One of my favorite DIY presents I’ve ever given is a wooden castle that I gave to my daughters a few Christmases ago. I’d often admired the amazing doll houses for sale at specialty toy stores and in high end catalogs, but I could never justify the hundreds of dollars they cost (and the additional hundreds of dollars it would take to fill it with furniture).

It wasn’t until I happened upon the unfinished wood section at my local Michaels store that it occurred to me to try to create my own for less than the retail price of a ready-to-play with toy. The moment I saw this Artminds Wood Castle Dollhouse, my creative juices started flowing. With my 40% off one regularly priced item Michaels coupon (available each week), I purchased it for a whopping $16.80.
Once I had the castle in possession, I had to create a game plan and budget for how to finish my project. So, I went through the toy aisles of my local Meijer to see which type of figures/dolls would be the right scale as the inhabitants of the castle. To my luck, I discovered an end-cap clearance of mini Lalaloopsy dolls—the perfect size—and I was able to score several of them for around $1.25 each.

What I loved about these particular figures, aside from the amazing price I paid for them, was their mis-matched colors and unique appearance. I liked that they were abstract rather than realistic looking, and it was from the uniqueness of the Lalaloopsy dolls that I drew inspiration for how to decorate the inside of my daughters’ castle.
 Back at Michaels I bought several colors of craft paint (which happened to be on sale for around $0.40 a tube). I also found foam brushes, along with a variety of scrapbooking embellishments (chosen from sale and clearance racks). I searched through the other unfinished wood products for ideas on creating my own DIY dollhouse furniture. I bought empty wooden spools and circles for tables, cubes to use for chairs, and wooden rectangles that seemed designed specifically for Lalaloopsy beds. A quick stop in the felt section to grab some pieces for blankets and curtains, and I was ready to get to work for a total of around $20 in materials.
I didn’t calculate the amount of time I invested into painting the castle and accessories. It was a labor of love, and honestly a lot of fun, so though I’m sure there were many hours poured into the project, it never felt like a chore. There were a few additional touches I added to the castle using materials from a stash of foam squares and letters as well as some scrapbook paper so that I could make each of its rooms unique. I was really excited about how it all turned out!
On Christmas morning, I arranged the castle unwrapped in front of the tree so that it would be the first gift my girls would see when they woke up. They were instantly in love with their one-of-a-kind doll house, and it was all they wanted to play with Christmas morning.
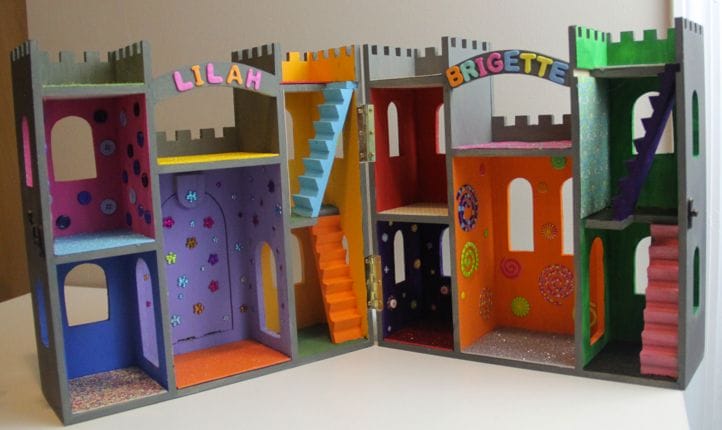
One of their friends even loved it so much that a few months later, my daughter wanted to make one for her, tailoring the details to her specific tastes. That’s the beauty of DIY gifts—they can be as unique as the person receiving it!
Overall, I was thrilled with the furnished doll house gift I was able to give my girls, all for under $50. If you asked them, I don’t know that they would remember any other present that was under the tree that year. I’m not sure that I do either.
Make Your Own Wood Castle Dollhouse
Materials
- Artminds Wood Castle Dollhouse (don’t forget to use a coupon!)
- Craft paint
- Foam brushes
- Scrapbook paper
- Craft foam
- Felt
- Small wooden pieces for furniture (optional) – spools, blocks, etc.
- Dolls – paint your own wooden dolls or buy mini dolls
Instructions
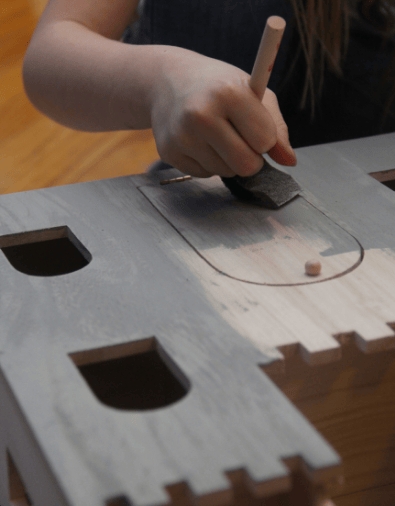
- PAINT both inside and outside of the wood castle. Consider using different paint colors for different rooms. You will need multiple coats to cover the wood completely. Pay special attention to corners (the stairs can be tricky)!
Need some inspiration? Take a look at these ready-made wood castles. - GLUE scrapbook paper on the walls and craft foam on the floor, as desired. If you would like to protect your paper, you can cover it with a coat or two of ModPodge or diluted Elmer’s glue.
- ADD EMBELLISHMENTS: Gems, 3D scrapbook stickers, puffy paint and whatever you choose!
- CREATE FURNISHINGS. Paint and glue wood pieces for creative tables, chairs and beds.
- ADD FELT and FABRIC to fashion small window coverings, bedding, rugs and more. If you’re not comfortable sewing, just use glue!
Above all, feel free to make it your own to match the likes of your recipient. The best part about a DIY wood castle is that it can be repainted and redesigned again later for a new look!
What’s your favorite DIY gift you’ve ever given or received? Did you find that making it was less expensive than buying new?
If you make a castle, please share a photo with us! Email it to bargainstobounty at gmail.com!
______________________
About the Author:
Lisabeth Posthuma is an indie novelist and blogger who resides in Southeast Michigan. She enjoys reading, photography, and obscure pop culture references. Visit her site at www.lisabethposthuma.com.
I just wanted to share that I saw that the dollar tree has doll house furniture and if I remember correctly it is ready to be finished so you could paint it whatever color you wanted.
Great tip, thanks!